Dec 15, 2014

Git Series: Installing Git on Windows

You have a “next, next, ok” installer, just be aware of:

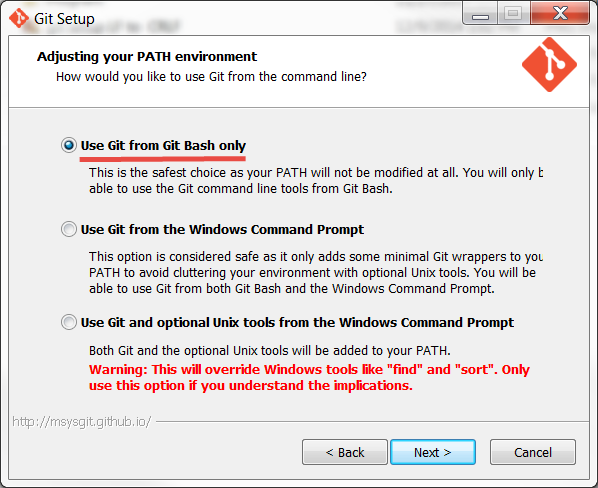
I haven’t found any problem selecting “Use Git and optional Unix tools from the Windows Command Prompt” but the safest option is “Use Git from Git Bash”


In UNIX systems the end of a line is represented with a line feed (LF). In windows a line is represented with a carriage return (CR) and a line feed (LF) thus (CRLF). Most of the open source projects use UNIX environments so go along with the first option. Select “Checkout as-is, commit as-is” if EVERYONE in your team is going to work in a Windows Environment


There are two ways to configure git:
Modifying files:
C:\Program Files (x86)\Git\etc\.gitconfig     # System level
$HOME\.gitconfig        # User level
repository\.git\config    # Repository level


Using commands
git config --system   # System level
git config --global    # User level
git config   # Repository level


Minimal

git config --global user.name “Xavier Figueroa”
git config -- global user.email “example@devm.com”
git config --list
user.name=Xavier Figueroa
user.email=example@devm.com
git config user.name


Given that you already have the git bash installed, you can use linux commands
.gitconfig is hidden, so in order to see the file you need to use ls –a
xavi ~ $ ls -a

To see the content you can use
xavi ~ $ cat .gitconfig
xavi ~ $ tail .gitconfig
xavi ~ $ vim .gitconfig


Set Default Text Editor

Install your favorite editor (Sublime, notepad++, atom)

git config --global core.editor "'c:/program files/sublime text 3/subl.exe' -w"
or
git config --global core.editor "atom --wait"
If you have problems you can try editing the .gitconfig file and use:
editor = 'C:\\Program Files\\Sublime Text 3\\subl.exe' -w


You can also set the GIT_EDITOR, VISUAL, or EDITOR environment variables.


Auto-Completion

In windows is provided by default, but if it is not working you can try:
Edit/create $HOME\.bashrc or $HOME\.bash_profile

if [ -f 'C:\Program Files (x86)\Git\etc\git-completion.bash' ]; then
    source 'C:\Program Files (x86)\Git\etc\git-completion.bash'
fi


Improve the bash

Edit/create $HOME\.bashrc or $HOME\.bash_profile

if [ -f 'C:\Program Files (x86)\Git\etc\git-prompt.sh' ]; then
     source 'C:\Program Files (x86)\Git\etc\git-prompt.sh'
fi
green="\[\033[0;32m\]"
cyan="\[\033[1;36m\]"
purple="\[\033[1;35m\]"
reset="\[\033[0m\]"
export GIT_PS1_SHOWDIRTYSTATE=true
export GIT_PS1_SHOWUNTRACKEDFILES=true
export PS1="$purple\u$green\$(declare -F __git_ps1 &>/dev/null && __git_ps1 ' (%s)')$cyan \W $ $reset"


Getting help

Pressing space or f will move you forwards or  pressing b will move you backwards as well
Pressing q stands for Quit will take you back to the command line


References:
http://blog.devm.org
http://git-scm.com/downloads
https://help.github.com/articles/set-up-git/
http://git-scm.com/book/en/v2/Customizing-Git-Git-Configuration
https://help.github.com/articles/associating-text-editors-with-git/
http://www.cyberciti.biz/tips/howto-linux-unix-bash-shell-setup-prompt.html

Git Series: Installing Git on Linux

See the 3:45 min video here

http://blog.devm.org/?p=64

If you are using Fedora 21 Workstation like me jump to step 5 ;)  


1 Installation

If you’re on Fedora-based, you can use yum:
$ yum install git
If you’re on a Debian-based distribution like Ubuntu, try apt-get:
$ apt-get install git
Configuration
There are two ways:

Modifying files
/etc/.gitconfig        # System level
~/.gitconfig          # User level
Repository/.git/.gitconfig   # Repository level


Using commands
git config --system # System level
git config –global    # User level
git config            # Repository level


2 Minimal

git config --global user.name “Xavier Figueroa”
git config -- global user.email “example@devm.com”
git config --list
user.name=Xavier Figueroa
user.email=example@devm.com
git config user.name


.gitconfig is hidden, so in order to see the file you need to use ls –a
xavi ~ $ ls -a

To see the content you can use
xavi ~ $ cat .gitconfig
xavi ~ $ tail .gitconfig
xavi ~ $ vim .gitconfig


3 Set Default Text Editor

git config --global core.editor "vim -w"
or set the GIT_EDITOR, VISUAL, or EDITOR environment variables.


4 Auto-Completion

curl -OL https://raw.githubusercontent.com/git/git/master/contrib/completion/git-completion.bash
curl -OL https://raw.githubusercontent.com/git/git/master/contrib/completion/git-prompt.sh


Rename file
mv ~/git-completion.bash ~/.git-completion.bash
mv ~/ git-prompt.sh ~/ .git-prompt.sh


Edit ~/.bashrc
if [ -f ~/.git-completion.bash ]; then
source ~/.git-completion.bash
fi
if [ -f ~/.git-prompt.sh ]; then
source ~/.git-prompt.sh
fi


5 Improve the bash

Add the following ~/.bashrc

if [ -f /usr/share/git-core/contrib/completion/git-prompt.sh ]; then
source /usr/share/git-core/contrib/completion/git-prompt.sh
fi
green="\[\033[0;32m\]"
cyan="\[\033[1;36m\]"
purple="\[\033[1;35m\]"
reset="\[\033[0m\]"
export GIT_PS1_SHOWDIRTYSTATE=true
export GIT_PS1_SHOWUNTRACKEDFILES=true
export PS1="$purple\u$green\$(declare -F __git_ps1 &>/dev/null && __git_ps1 ' (%s)')$cyan \W $ $reset"


6 Getting help

git help to see the list of commands
git help <specific command> to see how to use the command
Pressing space or f will move you forwards or b pressing b will move you backwards as well
Pressing q stands for Quit will take you back to the command line


References
blog.devm.org
http://git-scm.com/book/en/v2/Customizing-Git-Git-Configuration
https://help.github.com/articles/associating-text-editors-with-git/
http://www.sublimetext.com/3

Dec 13, 2014

Fedora 21 Guest in Windows Host using VirtualBox

I created a gallery to show you how to start working with Fedora using Virtual Box
In my VM I have:
2GB RAM
2 Processors
64MB In video Memory with 3D Acceleration Enabled
Virtual Disk with 20GB dynamically allocated.

See the gallery here

http://blog.devm.org/?p=28

Everything is working just fine, this is the first time that I can install and start working without major problems. I'm very glad with this new version of Fedora so far

References:
https://getfedora.org/en/workstation/
https://docs.fedoraproject.org/en-US/Fedora/21/html/Installation_Guide/
http://www.binarytides.com/vbox-guest-additions-fedora-20/
http://worldofgnome.org/installing-the-latest-virtualbox-guest-in-fedora/
http://blog.devm.org/?p=28

Dec 12, 2014

Git Series: Quick Intro

Git is a software that keeps track of changes and allows you to move back and forth between different versions to compare and see what changed between each one. Git is a VCS (Version Control System). When a VCS is used to manage source code, it’s also called a SCM (Source code management) too

VCS + source code = SCM


Let’s look back


Source Code Control System (SCCS) 1972. Closed source, free, Only for UNIX. It stored the original file and all the changes that went after it, so when you opened the file, it opened the original one and then all the changes were applied (low performance)

Revision Control System (RCS) 1982. open source, cross platform. It kept the most recent file in its whole form with all the previous changes, and only if you want a previous version, you applied the change snapshot to go backwards in time (better performance)

Concurrent Version System (CVS) 1986. Open source, cross platform. You could work with multiple files. Many users could work with a single repository over a network, the concept of remote repositories were introduced.

Apache Subversion (SVN) 2000. Open source, cross platform. It was faster and allowed to save different file formats. It kept track of directories not only of files, SVN applied transactions to update changes through many files and directories and mantain integrity

Bitkeeper scm 2000. Closed source, cross platform. First distributed versions control, it had a community version used for source code of the Linux kernel. In 2005 the community version disappeared

Git 2005. Open source, cross platform. Developed by Linus Torvalds as a replacement for Bitkeeper

Distributed Version Control


Every user maintain their own repositories. Changes are stored as change sets or patches and every user tracks only the changes that are useful for them.

It is a convention to establish a “master” repository and stay up to date with this master repository, but it is just a convention, we don’t have to

No need to communicate with the central server (work offline), it allows you to work independently and then submit your changes for inclusion or rejection

Nov 26, 2014

Ignore files in Git

In Terminal, navigate to the location of your Git repository and  type
touch .gitignore
Check this collection of useful .gitignore templates
This file usually appears in the root of the repository, you can get the root directory using
git rev-parse --show-toplevel
However we can have this file in any sub folder.

To ignore files that was already tracked we need to remove them from the index, but  first of all we need to Commit pending changes to avoid unexpected behavior
git rm -r --cached .
-r Allow recursive removal when a leading directory name is given.
-q git rm normally outputs one line (in the form of an rm command) for each file removed. This option suppresses that output.

git add .
git commit -am “Remove ignored files”
-a Tell the command to automatically stage files that have been modified and deleted, but new files you have not told Git about are not affected

If you get the warning
warning: LF will be replaced by CRLF in <file>The file will have its original line endings in your working directory.
You can simply use
git config core.autocrlf false
In Unix systems the end of a line is represented with a line feed (LF). In windows a line is represented with a carriage return (CR) and a line feed (LF) thus (CRLF). It’s nothing to worry about.

References
http://git-scm.com/docs/git-commit
https://help.github.com/articles/ignoring-files/
https://github.com/github/gitignore
http://git-scm.com/docs/gitignore

Apr 19, 2014

MediaWiki 1.22.6 on Fedora 20

Motivation

As many of you probably know, the next version of Fedora is under many changes F21 is not going to be released earlier than in late October
yum in FC20 only allows to install the version 1.21.8 so in order to have the most recent version we need to Install it as an rpm package or Manually
It is very likely to have problems during the installation, the main problem that I had was related with SELinux, so I hope this post can help you to save some time and headaches ;-)

Prerequisites

I recommend to have a Linux Manual just in case

Install these packages

Open a Terminal and become root
su
yum install -y httpd mysql-server php php-pear php-xml php-mysql php-intl php-php-pecl-zendopcache-apc php-gd php-mbstring ImageMagick-perl mailcap

Configure Services

service mysqld start (service mariadb start)
mysql_secure_installation
*be aware of the database version, mysql was replaced by mariadb
As a good practice you should disable anonymous access and don't allow root access remotely to your database

service httpd start
To make sure that the servers automatically start at boot-up, type the following commands:
chkconfig mysqld on (chkconfig mariadb on)
chkconfig httpd on

-Installing Manually

Drop the tarball or a clone
git clone https://gerrit.wikimedia.org/r/p/mediawiki/core.git
in a directory accessible to your web server
/var/www/html/wiki/

-Installing it as an rpm package

Download mediawiki-1.22.6-1.fc21.noarch.rpm from rpmfind.net
*select apropiate architecture
yum localinstall /root/Downloads/mediawiki-1.22.6-1.fc21.noarch.rpm
MediaWiki is installed in
/usr/share/mediawiki
with files specific to a site installed in
/var/www/wiki which contains:
config/
config/index.php
images/
index.php
Files in /var/www/wiki are used as a template and Apache can only access /var/www/html if not modified. So run
cp -a /var/www/wiki /var/www/html
the skin (the design and the css and js and images of the wiki) are still in /usr/share/mediawiki/skins which is not accessible by web server.
Make them accessible:
cp -a /usr/share/mediawiki/skins /var/www/html/wiki
or
ln -s /usr/share/mediawiki/skins /var/www/html/wiki/skins

Running the Installer

Navigate to localhost/wiki with your favorite browser.
If you are accessing that page for the first time, it would ask you to setup the wiki.
Follow that link which should take you to the setup page.
Fill in everything and click install button.
Create a new Mysql user (suggested by the installer)
Fill if you want a database prefix.
if everything goes right, MediaWiki installation successful page will be displayed.
LocalSettings.php has to be moved from config/ directory to the parent directory.
mv /var/www/html/wiki/config/LocalSettings.php /var/www/html/wiki
Delete the config directory for security reasons.
rm -fr /var/www/html/wiki/config

and that´s it!! :D
I'm not an expert so if you have any comment, correction, addition, question just let me know ;)
I hope to upload a video in a few days so if you have a suggestion also let me know

Troublesutting

PHP source code in localhost/wiki
Restart your httpd server

Permission Denied error
The minimum required for the wiki files and directories is
chmod 644
so check using ls -l
Also, you may need to change SELinux configuration
setsebool -P httpd_read_user_content 1
setbebool -P httpd_enable_homedirs 1
more info about SELinux

References

http://www.mediawiki.org/wiki/Manual:Installation_requirements
http://www.mediawiki.org/wiki/Download_from_Git
http://www.mediawiki.org/wiki/Manual:Running_MediaWiki_on_Fedora
http://www.wikihow.com/Install-MediaWiki-on-Fedora
http://www.mediawiki.org/wiki/SELinux